前言
前陣子相當恰好的常有跑大量實驗的需求,跑著跑著就開始覺得管理實驗執行和整理數據實在相當繁瑣且容易產生錯誤。
以執行而言,由於處理的檔案龐大、計算時間冗長、使用機器繁多,如何最有效率的把實驗跑完,同時又盡可能避免重複計算浪費時間,就成了難題。尤其考慮有時會因為不可抗力因素導致部份實驗中斷,此時要如何從一半的結果繼續執行,同時又最節省時間也是值得思考的點。
管理實驗數據部份,也因為使用機器增多及實驗繁多而複雜了起來。看到有種作法是利用 bash script 或者 Makefile 紀錄參數,然後將不同參數輸出的 stdout 導進指定的檔案名字裡來產生不同條件的實驗數據。不過這樣做很容易就會不小心改了參數卻把輸出導進錯誤的地方,導致最後數據錯誤。同時如果有很多台機器,資料又存在本機,那就得進行不少手動處理而無法全自動重現實驗結果。
感覺如果每次開始新的實驗就在程式碼中使用大量的自訂程式來處理這些問題好像一不小心就會花去太多時間。可是如果在忙亂中持續用奇怪的作法做實驗,心中的不安全感產生的焦慮又與日俱增,實在相當痛苦。
之前問了友人:
「大大都怎麼跑實驗阿?」
「包成 Docker 先放著。或是用 Makefile + GitLab 做版本管控。 用 Jenkins + ZooKeeper 管理,然後隨時打點 OpenTSDB 用 Grafana 監控。」
感覺好像相當有道理。像是可以把各種 jobs 交給 Jenkins 管理,藉此得知哪些已經跑完,哪些還要跑,然後選擇要在什麼機器跑,並且將結果回收到同一個地方。不過實際上到底要如何做到實在也找不到範例可抄襲。
由於每天實在過得很忙亂,只好苟且的一天過一天。好不容易有個週末無車無人的時刻,趕緊稍微做點小實驗來測試怎麼樣的作法較好。
這次要介紹的 Sacred 其實最早是去年讀到 〈Show Your Work: A Month with Sacred〉 這篇文章時所發現的。它是從遠在瑞士的 Istituto Dalle Molle di Studi sull’Intelligenza Artificiale (IDSIA) 發展出來的一套工具,據說就是企圖解決做實驗難題的一個嘗試。
環境設定
為了使用 Sacred,首先我裝了一套 MongoDB,為了方便起見我就參考教學直接裝在本機上。接著用 pip3 安裝 Sacred 相關套件,因為不知為何不指定版本會裝到舊的,所以這裡我就指定了 Sacred 的版本:
pip3 install sacred==0.7b3 pymongo除此之外也安裝其他實驗會用到的套件:
pip3 install xgboost jupyter matplotlib numpy tensorflow-gpu scikit-learn sacredboard實驗設計
這次我打算用知名的 MNIST 手寫辨識資料集來做實驗,不過我將把訓練資料集隨機取樣 500、1000 或 1500 個來訓練分類器,藉此測試他們在資料稀少時的效能。同時為了避免受到取樣偏差的影響,同樣大小的取樣我會各作十次,再將十次的結果取平均值。
這次測試的分類器則是預設參數的 xgboost、linear svm 和一個順便練習 TensorFlow 實作的 SoftmaxClassifier。
主程式
首先設定這次實驗所需的參數,我用最簡單的方法,使用 ex.config 來宣告實驗參數。其中亂數種子 seed 因為預設本來就有,就不特別列出了。
# mnist.py
from sacred import Experiment
ex = Experiment('mnist_sampled')

@ex.config
def my_config():
    sample_size = 500
    classifier = 'svc'
緊接著實作實驗程式,每次將資料進行取樣,並且利用特定的分類器去驗證效能。利用 ex.automain 來宣告實驗主程式`。
# mnist.py
from sklearn.metrics import accuracy_score
from tensorflow.examples.tutorials.mnist import input_data

@ex.automain
def run_experiments(data_dir='MNIST_data'):
    mnist = input_data.read_data_sets(data_dir, one_hot=False)
    X_test = mnist.test.images
    y_test = mnist.test.labels

    X_train, y_train = sample_data(mnist.train.images, mnist.train.labels)

    clf = get_classifier()
    clf.fit(X_train, y_train)
    y_train_pred = clf.predict(X_train)
    train_accuracy = accuracy_score(y_train, y_train_pred)

    y_test_pred = clf.predict(X_test)
    test_accuracy = accuracy_score(y_test, y_test_pred)

    return {'train_accuracy': train_accuracy, 'test_accuracy': test_accuracy}
接下來實作取樣和選擇分類器的函式。值得注意的是,實驗參數因為可以被 Sacred 透過 ex.capture 自動傳入,所以呼叫子函數時可以不直接傳進去也沒關係。此外,_rnd 是一個會根據 seed 來決定的亂數器,在每次實驗時,只要 seed 一樣,則同一個函式呼叫被呼叫特定次數時的 _rng 就會產生一樣的亂數,所以可以確保取樣出來的資料是一樣的。詳情可見:〈Controlling Randomness〉。
# mnist.py
import numpy as np
import xgboost as xgb

from sklearn.svm import LinearSVC

from softmax import SoftmaxClassifier

@ex.capture
def sample_data(X, y, sample_size, _rnd):
    indices = np.arange(X.shape[0])
    choice_indices = _rnd.choice(indices, sample_size)
    return X[choice_indices, :], y[choice_indices]


@ex.capture
def get_classifier(classifier):
    if classifier == 'svc':
        return LinearSVC()
    elif classifier == 'softmax':
        return SoftmaxClassifier()
    elif classifier == 'xgb':
        return xgb.XGBClassifier()
    else:
        return None
SoftmaxClassifier 的程式我放在 softmax.py。 如有興趣可自行參考。
執行實驗
我寫了一個簡單的 bash script 來幫我執行所有想執行的實驗。當然這種作法會導致 MNIST 被不斷重複讀取,感覺不是很有效率,若想節省機器時間或許可以考慮用 ex.run 來執行程式。
#!/bin/bash

for clf in svc xgb softmax ;
do
  for sample_size in 500 1000 1500 ;
  do
    for seed in 1 2 3 4 5 6 7 8 9 10 ;
    do
      python mnist.py with classifier=$clf sample_size=$sample_size seed=$seed -m sacred || exit 1
    done
  done
done
使用 Sacred 的程式可以直接用 with 選項來傳入所有實驗參數。至於 -m 則是指定要寫入的 MongoDB 位址。由於我的資料庫直接裝在本機,所以這裡單純指定了資料集的名字。詳情可見:〈Command-Line Interface〉。至於 || exit 1 則是為了讓我如果手動中斷程式時,for loop 可以被中斷而不會繼續跑下去。
回收結果
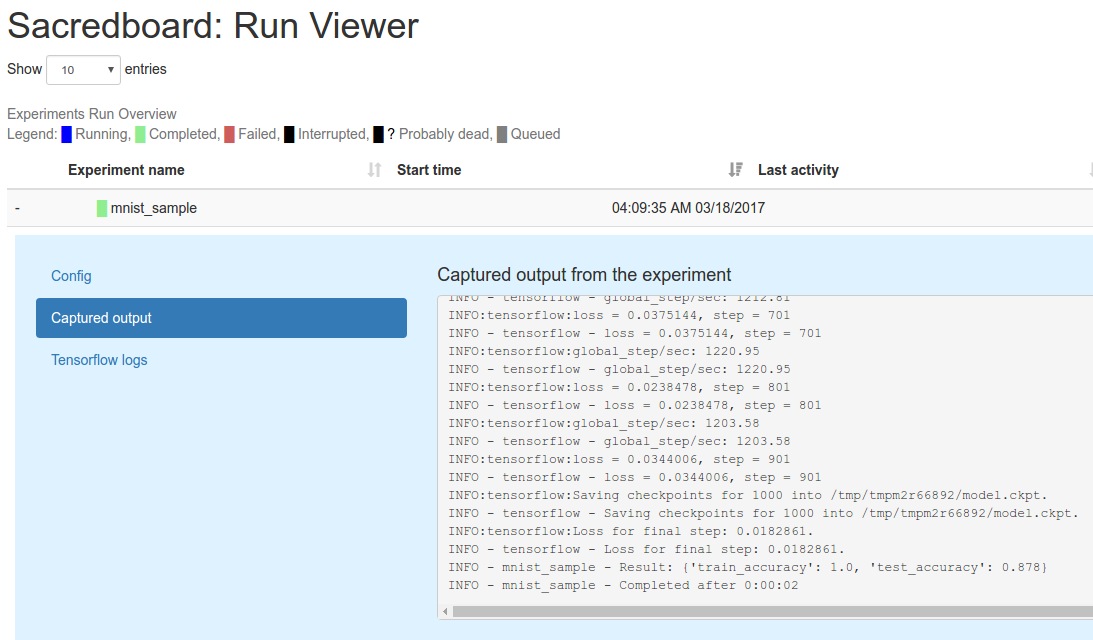
一旦執行了以後 Sacred 就會自動將實驗參數、回傳結果以及一些像是執行時間、執行過程的 stdout 等等通通都寫進 MongoDB 當中。我們也可以執行 sacredboard 來觀察執行狀況。不過老實說這功能實在還有點陽春:
sacredboard -m sacred
是以,我們還是自己寫個程式來回收吧。還好 MongoDB 裡紀錄了所有實驗參數,因此要回收特定數據也是相當容易的。
這次我們還是會用 Jupyter Notebook 方便畫圖。首先連結到本機的 MongoDB:
from pymongo import MongoClient
mc = MongoClient()
db = mc['sacred']
緊接著把每個分類器在不同情形的十個數據都回收:
import numpy as np

sample_sizes = (500, 1000, 1500)
classifiers = ('svc', 'xgb', 'softmax')

results = []
for clf in classifiers:
    clf_mean = []
    clf_std = []
    for sample_size in sample_sizes:
        test_accuracy = []
        for seed in range(1, 11):
            result = db['runs'].find_one({'experiment.name': 'mnist_sampled',
                                 'config.classifier': clf,
                                 'config.sample_size': sample_size,
                                 'config.seed': seed,
                                 'status': 'COMPLETED'},
                                {'result': 1})
            test_accuracy.append(result['result']['test_accuracy'])
        clf_mean.append(np.mean(test_accuracy))
        clf_std.append(np.std(test_accuracy))
    results.append((clf_mean, clf_std))
最後則把結果畫出來:
import matplotlib.pyplot as plt

fig, ax = plt.subplots(nrows=1, ncols=1, figsize=(8, 6))

ax.set_title('Test Accuracy of Different Classifiers on MNIST')
ax.set_xlabel('sample size')
ax.set_ylabel('test accuracy')

xticks = np.arange(len(sample_sizes))
ax.set_xticks(xticks)
ax.set_xticklabels(sample_sizes)

for i, clf in enumerate(classifiers):
    ax.errorbar(xticks, results[i][0], yerr=results[i][1], label=clf)
ax.legend(bbox_to_anchor=(1, -0.1))

plt.show()

完成!
結語
本次的實驗程式放在 shaform/experiments/sacred,最後的 notebook 同時也可以在 Sampled MNIST 上觀看。

